Why I Love Sewing Fabric Flowers from Scraps
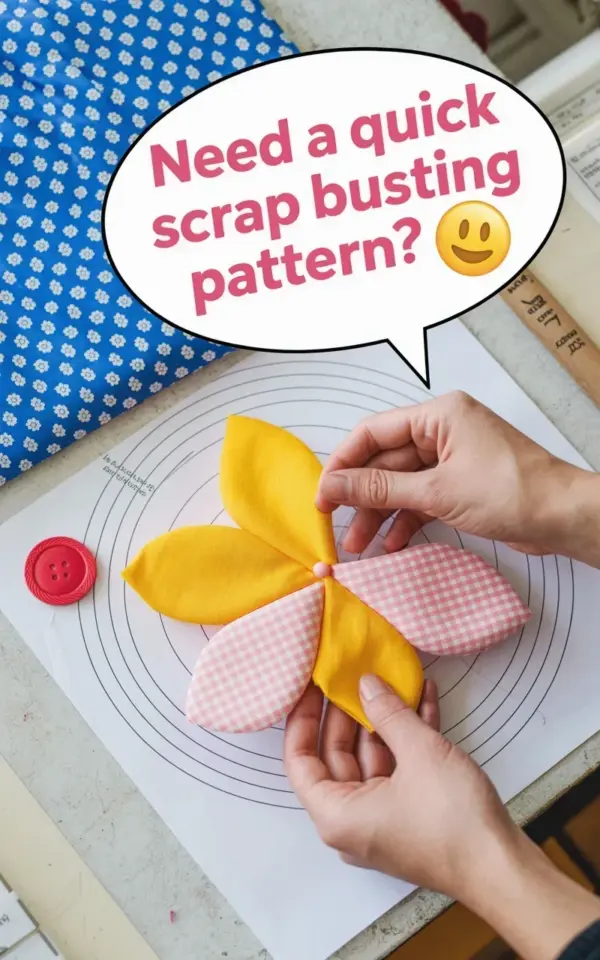
Honestly, I have a box of fabric scraps that never seems to shrink. Every time I finish a quilt or a dress, I promise myself I’ll use up the leftovers. And then I stuff them in a drawer and forget. Sound familiar? This little fabric flower project changed that for me. It is my go to scrap busting idea now because it takes maybe ten minutes and uses pieces that are too small for anything else. You know that yellow solid and pink gingham you see in the photo? Those were leftover from a child’s apron I made two years ago. The red button center came from a jar my grandmother kept. And the blue floral fabric in the top corner? That is a scrap from a tote bag I never finished. Anyway, this project is fast, satisfying, and genuinely useful.
The white circle paper pattern you see on the cutting mat is what makes it so easy. No measuring, no math. Just trace, cut, and sew. If you have ever avoided scrap projects because they feel fiddly, try this one. It is the opposite of fiddly. It is almost stupidly simple.
Gathering Your Scrap Fabric Pieces and Notions
So what do you actually need? Not much. Here is what I used for the flower in the photo:
- One yellow solid scrap (about 3×3 inches)
- Two pink gingham scraps (same size)
- One red button with four holes
- A small piece of white paper or cardstock for the pattern circle
- Needle and thread (or a sewing machine)
- Scissors
That is it. No interfacing, no glue (unless you prefer it). The button is really the key for me. I like a button that has some weight. The red one stands out against the yellow and pink, and it gives a nice focal point. You could also use a wooden button or a covered button if you want a different look. But look, the whole point is using what you have. So raid your button jar. Pick something that makes you happy. That blue floral scrap in the corner? I thought about using it for a petal, but I wanted the yellow and pink to be the stars. I will save that blue for another flower.
Making the Paper Pattern Circle (The Simple Trick)
Here is the part that might feel silly, but it works. I grabbed a water glass from my kitchen, turned it upside down, and traced around the rim onto a white piece of printer paper. That gave me a perfect circle. It was about 3.5 inches across. Honestly, you do not need a compass or a fancy template. A jar lid works. A yogurt container works. Anything round. The white paper pattern is visible in the photo because I keep it pinned to my cutting mat for reuse. That is my advice: make one pattern circle and keep it with your scrap bin. Then you never have to measure again. I wrote “flower circle” on mine in pencil because I would forget otherwise.
Cut out the paper circle. That is your pattern. You will use it to cut three fabric circles. One from yellow, two from pink gingham. Or whatever colors you choose. But if you follow my exact combination, you get a flower that looks like a little sunflower with a gingery pastel twist. Not gonna lie, I am a sucker for pink gingham.
Cutting the Petals from Yellow Solid and Pink Gingham
Place your paper circle on each fabric scrap and cut around it. For the yellow solid, I cut one circle. For the pink gingham, I cut two circles. That gives you three fabric circles total. Now here is the fun part: you do not cut them into petal shapes yet. You keep them as circles and fold them. Let me explain. Fold each circle in half, then in half again, so you have a quarter circle. Then fold that in half one more time? No, stop at quarter circle. Ok, I am overcomplicating it. Here is what I actually do: I fold each circle in half, press with my fingers, fold in half again, press again. So you get a wedge shape that looks like a pizza slice. That wedge will be one petal. You do that for all three circles.
Then stack the wedges on top of each other. I put the yellow in the middle with the pink gingham wedges on each side. The folds create the petal shape naturally when you sew the center. It sounds too simple but it really works. The photo shows the fabric circles already folded and stacked near the button. See how the yellow is sandwiched? That is what gives the flower depth.
Assembling the Flower with a Red Button Center
Thread your needle with a double strand of thread. Knot the end. Take your stacked folded circles and pinch them at the pointed tip. Push the needle through all layers near that tip. Pull through. Then thread the needle through the red button. Go through one hole, down through the other hole. Then push the needle back through the fabric layers near the tip again. Pull tight. That button is now holding everything together. Sew through the button and fabric a few more times to secure it. Knot on the back side. That is literally the whole assembly. The folds fan out like petals. You can fluff them with your fingers. The button center also acts as a weight, so the flower lays flat when you attach it.
I used a red button with four holes and sewed an X pattern through the fabric. But three holes? Two holes? Whatever you have works. My grandmother’s button jar had a mix. I picked the red one because it reminded me of the center of a daisy. Does it look like a daisy? Not really. It looks like a scrap flower. Which is better.
Tips for Using Up Even Smaller Scraps
What if your scraps are smaller than 3 inches square? Two things. First, you can use smaller circles. A 2.5 inch circle still makes a cute mini flower. Second, you can use two layers instead of three. Or you can cut one circle from a larger scrap and make a single-petal flower by folding it many times. I tried a version with four circles once. It looked like a cabbage. Not my favorite. So stick with three circles for the best proportion.
Another tip: if the fabric frays badly, you can run a quick zigzag stitch around the edge of each circle before folding. But honestly, for a home decor craft, a little fraying adds charm. My yellow solid is a cotton broadcloth, which frays nicely. The pink gingham is a poly-cotton blend and barely frays. The mix gives texture. One more thing: store your finished flowers in a jar or box. I keep a few on my sewing table. When I need a quick gift tag embellishment or a hair clip, I grab one. The blue floral scrap in the top left of the photo? I used it to make a different flower later. It is thinner fabric, so I doubled it. Worked fine.
Creative Ways to Use Your Fabric Flower (Not Just Pinning)
So what do you do with these little fabric flowers? I have used them as:
- Bobby pin or hair elastic decorations (sew an elastic band on the back)
- Brooch or pin for a jacket lapel (attach a safety pin or pin back)
- Gift wrap topper (glue or stitch onto twine)
- Zipper pull charm for a bag
- Patch to cover a stain on a child’s shirt
The last one is a real life use. My niece had a small hole in her favorite pink shirt. I stitched one of these flowers over it and she wore it for another year. That is the beauty of scrap busting. You solve a problem and make something pretty. Also, you clear out that drawer. Which is a win.
Conclusion: Give Scrap Busting a Try with This Flower
I started this project because I needed a quick win. My scrap box was overflowing and I wanted to make something with my hands that did not require a lot of thinking. This fabric flower gave me that. It took less time than making a cup of tea. And now I have a little pile of them sitting in a bowl on my windowsill. They catch the light and remind me that small pieces can become something whole. If you have a yellow solid scrap and pink gingham, a red button, and five minutes, you can make one too. So go dig through your scraps. Grab that white paper and a glass. Trace a circle. Fold, stitch, button. You will have a flower before you know it. And honestly, it feels good. Save this post for your next sewing project. You will thank yourself later.
#scrapbusting #fabricflower #sewingscraps #sewingproject #diyscrapcraft
Leave a Comment