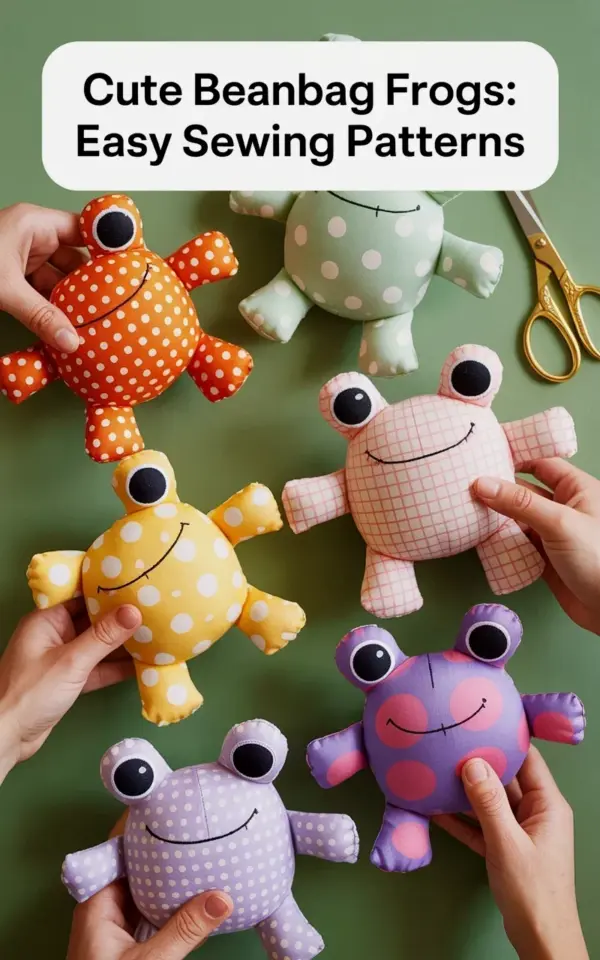
I have strong opinions about plushie sewing, and here’s the thing: I judge every pattern by whether it makes me want to stop everything and cut fabric immediately. This beanbag frog pattern did exactly that. If you have been scrolling for a fun, quick project that doesn’t require a million pieces, this little guy is your new best friend. I mean, look at the photo, a whole lineup of chubby frogs in polka dots, pink plaid, mint green, and purple, just waiting for a rainy afternoon.
Ok so, we are deep in that transitional season where the light gets golden and the air gets crisp. It is the perfect time to shut the laptop and make something with your hands. This frog is the ideal candidate for that cozy vibe because it comes together fast, but it feels like a real achievement. Plus, you get to use up those scraps of fabric that have been haunting your stash. Let me walk you through exactly how to sew these adorable little guys, from fabric choice to the final stitch.
—
Why This Polka Dot and Plaid Frog Sewing Pattern Feels Right for Fall
There is something about the color palette in the original photo that screams “autumn crafting.” You have that rich orange polka dot frog sitting right next to the mint green one, and oddly enough, they look perfect together. It is unexpected. That is the magic of this project, there is no rule saying your frog has to be green.
This is a great way to use up those pre-cut charm squares or fat quarters you bought on a whim. You know the ones, the prints that are too loud for a quilt but too cute to throw away. A plaid frog gives off a totally different vibe than a polka dot one. The plaid feels a bit preppy and cozy, while the polka dots feel playful and childish. Which personality are you sewing for? That is a rhetorical question, but seriously, the fabric choice does all the work for you.
The Best Fabrics for a Beanbag Frog: Beyond the Usual Quilting Cotton
Look, quilting cotton is the safe choice. It is easy to sew, it presses well, and it holds its shape. But for a stuffed toy that is meant to be squished, I actually prefer a slightly heavier fabric. A cotton canvas or a soft homespun decor weight fabric gives the frog a more substantial feel.
Here is a quick breakdown of what works:
- Quilting Cotton: Perfect for beginners, crisp and holds wrinkles well, but it can feel a bit thin.
- Cotton Canvas: My personal favorite for this pattern. It gives the frog a sturdy, yet soft, body that feels durable in a child’s hands.
- Minky or Cuddle Fabric: Honestly, this is a luxury option. It is slippery and a pain to sew with, but the final result is impossibly soft and huggable.
If you are aiming for that exact look from the product photo, stick with simple cotton broadcloth. The vibrant colors, like that bright yellow polka dot and the deep purple, really pop on a matte cotton surface. Just pre-wash your fabric to avoid any weird shrinking after you have already sewn the frog together.
Getting the Right Weight: What to Put Inside Your Stuffed Frog
The name of the game is “beanbag”, so you need to commit to the weight. I do not recommend using just polyester fiberfill. It is too light and fluffy, and your frog will just roll around awkwardly instead of sitting nicely. You want that satisfying, heavy flop when you toss it on the couch.
The secret is to use glass bead pellets mixed with fiberfill. You can buy these pellets at any craft store, usually in the doll-making aisle. Do not use rice or beans, they will eventually rot or attract bugs. It is a bit of an investment, but a bag of pellets lasts for years of projects.
For the body, try this: fill the bottom half of the frog with the pellets until it is about two-thirds full. Then, stuff the head and arms with regular fiberfill. This gives the frog a solid base to sit up on, but keeps the top half cuddly. If you want to keep it simple, just using the pellets is fine, but I find the mixed method gives a much more premium feel.
Reading the Frog Sewing Pattern: The Pieces You’ll Need
Most of these frog sewing patterns online follow the same basic structure. You are looking at a back piece, a front piece, maybe a separate bottom gusset, and the arms and legs. The key is to match the notches on the pieces during your research. If you have never read a PDF pattern before, do not panic.
Start by printing your pattern at 100% scale. Do not let your printer scale it down to fit the page, that is a classic mistake that results in a very weird-looking frog. Cut out your pattern pieces carefully with a paper scissors, not your fabric scissors, because paper dulls blades fast.
When you cut the fabric, fold your material right sides together and pin the pattern pieces on. Cut out all the pieces at the same time, that way you have mirrored pairs for the arms and legs. I like to cut the body pieces and the limb pieces from different fabrics. Imagine the purple frog in the original photo, I would absolutely make its arms and legs out of that pink accent fabric. That little detail is pure personality.
Sewing the Frog Body: A Step by Step Guide (Minus the Fussy Stuff)
Ok so, here is where the magic happens. I like to sew the limbs first. Stitch the arms and legs together, right sides facing, leaving the straight edge open so you can turn them right side out later. Use a chopstick or a blunt pencil to push the curves out nicely. Trim the seam allowance around the curved parts with small snips. Do not skip this. It is what makes the limbs look like actual frog legs instead of weird lumps.
Next, you attach the limbs to the body. Sandwich the raw edge of a leg between the front and back body pieces, pin it in place well, and sew. It feels weird to sew over a bump like that, but it secures the limbs perfectly. Now, for the bottom piece. This is what gives the frog the beanbag shape.
Pin the bottom gusset to the body, right sides together, matching the center marks. The sewing becomes a bit tricky here because you are sewing a curved seam that turns a corner. Go slow, and stop with your needle down at the pivot points. It is not a race. Once it is sewn, turn the whole thing right side out. You will immediately see the frog shape appear. That moment never gets old, it is like a little magic trick.
Leave a gap on the bottom to turn the frog. You will use this same gap to add your pellet blend. Do not try to make the gap too big or the sewing looks messy. Just cut about an inch and a half opening in the middle of the bottom seam. It really is the best way to bring the whole thing together.
Finishing Your Stuffed Toy Frog: Adding a Face and Personality
This is the part where you really cannot rush. How you sew the face determines the entire mood of your finished frog. Look at the ones in the photo; they all have slightly different vibes because of their features. You want the eyes to be wide and happy.
I usually cut two small circles of contrasting fabric for the eye patches. Think the yellow frog with its contrasting face, versus the purple frog with the pink accents. That is where the fun is. I also recommend placing these white circles aside over the top of the head and pinning them securely. Sewing them around the edge with a small zig-zag stitch prevents fraying and gives it a professional look. A blanket stitch by hand also looks gorgeous if you are feeling fancy.
For the eyes themselves, use black embroidery floss or thread and make a French knot, or just a tight satin stitch. Honestly, French knots are cute and classic. For the mouth, I love a simple backstitch with a little “p” shape. You can barely tell these frogs are adorable if the mouth is uneven, so if you are a perfectionist, draw the mouth lightly with a water-soluble pen first. Go with the hand-sewing route for the smile. It is faster and adds that nice “home-made” charm that you are aiming for.
Throw in a little blush circle on the cheeks if you want to. Just a simple running stitch in the center of the cheek area using pink thread. It makes them look super innocent.
—
So there you have it. A quick guide to sewing your own beanbag frogs that are destined to become a favorite handmade gift. They are the perfect size for little hands to hold, and the weight makes them a great fidget toy for older kids too.
Which color combination is calling your name? The classic mint green with polka dots, or the wild orange and yellow duo? I am curious which one you would pick first. Let me know in the comments below, and do not forget to tag me in your photos when you share them on social media. Happy sewing, folks.
#beanbagfrog #stuffedtoysewing #diyplushie #frogsewingpattern #handmadegifts
Leave a Comment