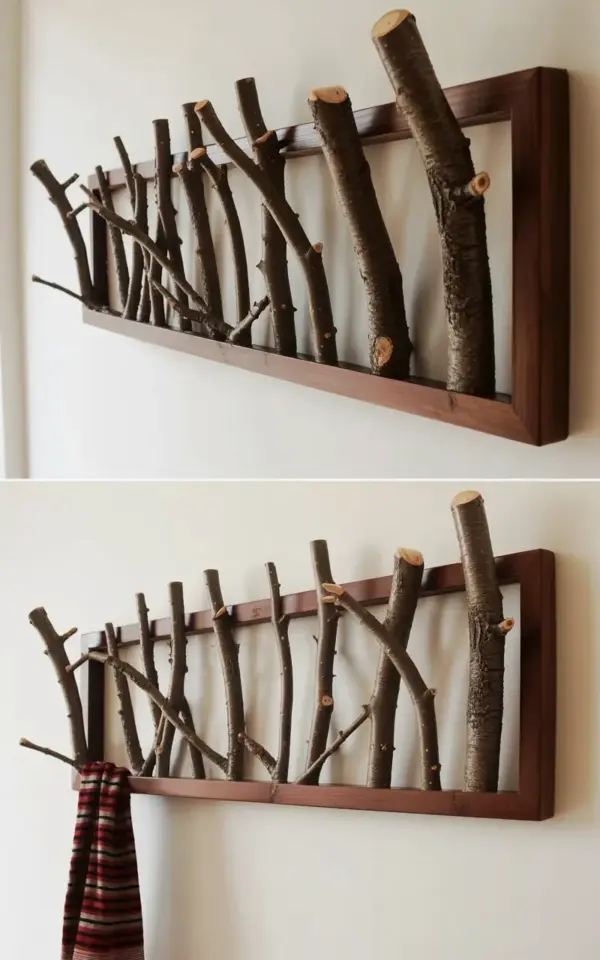
I get it. You’ve seen the Pinterest photo, the one with those gorgeous, bark-covered branches set against that dark wood frame. It looks effortless, like you could just screw some sticks to a board and call it a day. But after building a few of these things (and ruining two perfectly good walls in the process), I can tell you there’s a right way and a very wrong way to do it.
That rustic wall-mounted coat rack is having a serious moment in farmhouse entryway decor, and for good reason. Those natural branches break up the monotony of a flat wall and bring a little bit of the forest inside. But look, most DIY versions end up looking like a pile of firewood that fell off a truck, not a curated piece of organizational art. So let’s walk through the biggest mistakes people make when they try to build one of these, and exactly how you can avoid them.
## Mistake 1: Choosing Branches That Are Too Uniform (Or Too Brittle)
The first time I tried to make one of these, I went into my backyard and grabbed a bunch of sticks that were all roughly the same thickness. The result? It looked like a ladder that had a bad accident. The photo you’re referencing works because the tree branches are wildly different sizes, some are thick and chunky, others are thin and delicate.
Don’t overthink the wood type, but absolutely flex each branch before you commit to keeping it. If it snaps easily in your hands, it’s going to snap under the weight of a wet winter coat. Look for dead, seasoned wood that’s still solid. Ash, oak, and maple are prime. Pine can work if it’s dry, but it dents easily. And honestly, the bark should be firmly attached, if it’s peeling off in strips, you’ll have a mess all over your floor within a month. Grab a ruler when you’re gathering materials, you’d be surprised how much variety you actually need. Aim for a range that spans from a slender 1 inch diameter up to a chunky 3 inches.
## Mistake 2: Skimping on the Backer Board and Frame
Here’s the thing about mounting heavy wood to drywall: the drywall won’t hold it. A dark wooden frame that’s actually functional needs to be anchored into a stud. I see so many people trying to mount these racks with those little plastic drywall anchors that come in the kit, and it’s a disaster waiting to happen.
– Use a solid 3/4 inch thick board for the frame, not that flimsy 1/2 inch plywood.
– Pre-drill your screw holes through the frame and into the wall studs.
– If you can’t hit a stud, use toggle bolts rated for at least 50 pounds.
– Countersink your screws so they sit flush with the back frame.
That dark, thick frame you see in the picture isn’t just decorative. It provides the structural rigidity needed to keep those horizontal branches from bowing in the middle when you hang a heavy Carhartt jacket on them. Don’t undermine it with weak fasteners, future you will be cursing when you hear a crash at 2 AM.
## Mistake 3: Ignoring the Organic Pattern (Or Making It Chaos)
Ok so, the arrangement of the branches matters way more than people think. You don’t want a perfectly parallel set of sticks, that looks robotic. But you also don’t want a tangled mess of wood that looks like a beaver’s dam. In the inspiration photo, the branches create a “forest-like pattern” that flows horizontally across the frame.
The trick is to keep the bottom edge fairly flat where the coats will actually hook on, but let the top edge wander naturally. Lay out your branches on the floor in front of you before you cut anything. Step back and squint at it. Does your eye have a path to travel? Are the thick branches balanced out by the thin ones? Shift things around until it looks like they grew together naturally. If you’re struggling, start with your thickest branch at the bottom and work upward to the thinner ones, that gives you a solid visual base.
## Mistake 4: Screwing Everything Together Without a Plan
This is the mistake that ruined my second build. I was so excited to see it go together that I just started driving screws through the branches into the frame from the back. Problem is, a screw needs a pilot hole or it will split the branch clean in half. Imagine the sound of cracking wood and the sudden realization that you just ruined a perfectly good piece of oak. Yeah, I did that.
You need to pre-drill every single hole. Run the drill bit all the way through the branch and into the frame, then use a longer screw to secure it. For the love of all things holy, don’t use drywall screws. Use coated deck screws or something with a corrosion-resistant finish. You’re going to get moisture on these when you hang damp scarves up, and rust marks will eventually bleed down your beautiful white wall.
## Mistake 5: Forgetting About the Coat Hooks Altogether
Here’s the thing that separates a decent rack from a fantastic one: you don’t actually need hardware hooks. The branches themselves are the hooks. But you need to make sure they protrude enough to actually hold something. If they’re cut too flush to the frame, your hats and coats will just slide right off the end.
When you cut the branches to length, leave a little overhang beyond the frame edge on the front side. Also, consider the angle. A branch pointing perfectly horizontal will sometimes let things slip. It’s hard to notice in the photo, but a slight upward tilt at the tip of the branch gives you a natural “stopper” that keeps hangers from sliding off. The varying sizes of the branches do this naturally, which is a big part of why that design in the picture works so well.
Bark is also your friend here. A smooth branch loses grip, but the rough, textured bark from the tree helps create friction that holds your bags and jackets in place. It’s an organic look, but it’s also just practical engineering.
## Mistake 6: Skipping the Protective Finish
Look, the bark is pretty, but it sheds. A year from now, you’ll find little bits of bark falling onto your floor unless you seal it. I know people who skip this step because they want to keep the “raw” look. I get it, I really do. But you can clear-coat it and still keep the rustic aesthetic.
Use a matte polyurethane or a clear matte sealer. Apply two light coats with a brush, making sure you get the underside of the branches and inside the crevices of the bark. This stops the shedding and also gives the wood a slight sheen that catches the light. It also makes it a million times easier to dust. Speaking of dusting, you’re going to need to do that, cobwebs love to latch onto those bark edges. It’s a small price to pay for having a wall feature that looks like a slice of the forest in your mudroom.
## Styling Your Mudroom Around the Rustic Organizer
Once you’ve nailed the build, the styling is the fun part. Because the rack itself is so busy with texture and organic movement, keep the surrounding decor simple. Throw a woven basket underneath for shoes, and maybe a single piece of pottery. Don’t hang a framed picture directly above it, it will clash with the branches. The design is a statement piece, it doesn’t need a lot of help.
If you’re building this for a farmhouse entryway, lean into the imperfections. A crooked branch is a feature, not a flaw. Different shades of bark within the same frame, that’s a good thing. It’s what makes your rack look like it was collected from a real place, not bought in a box from a big-box store. And if you’re placing it near a front door, make sure it’s not in direct sunlight all day. UV rays will fade the bark and turn those rich brown tones into a washed-out gray faster than you’d think.
Building this rustic wall-mounted coat rack isn’t hard, but it demands a little patience and a lot of respect for the materials. Take your time sourcing the branches, anchor it properly, and seal it when you’re done. The reward is an entryway organizer that’s genuinely one of a kind, a functional piece of nature that your guests will actually stop and ask about. I’d love to know how your build goes, or if you hit a snag with a branch that just won’t cooperate. Drop a comment with your story, we can swap war wounds. 🌿
Leave a Comment