How to Hang a Driftwood Branch on a Wall (Even If You’ve Never Mounted Anything)
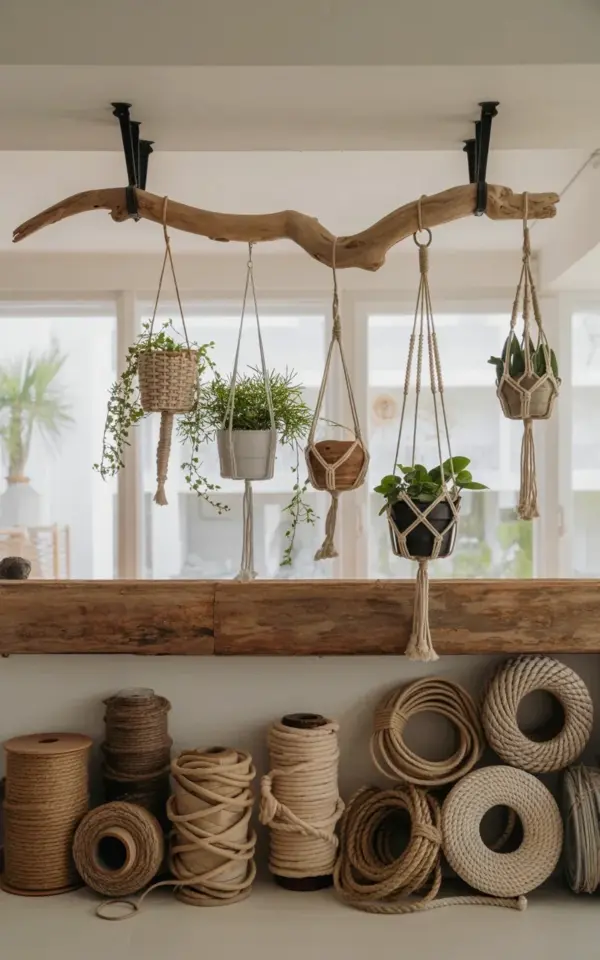
The branch in this photo is large and a bit curved. That actually makes hanging easier because you have two stable points. You want a sturdy wall anchor. I used black hooks from the dollar store, the kind that screw into drywall. Measure the branch first, then mark the wall where the natural balance points are. Screw one hook, hang that side, then level the branch before adding the second hook. Honestly, it took me ten minutes. My first attempt used picture nails and the branch fell onto the sofa, so trust me: use hooks.
For a heavier branch, you can wrap jute twine around both ends and make a loop. Then hook the loops instead of drilling into wood. That’s the trick I lean on when the driftwood is too pretty to poke holes in. And if you want the branch to sit close to the wall, use shorter screws or add a small felt pad on the back to stop it from rocking.
Budget Farmhouse Supplies: The Complete Dollar Store Shopping List
You don’t need a fancy craft store for this. Here’s what’s in the photo and roughly what I spent. Most of it can be found at a dollar store, a thrift shop, or on the side of the road.
- Driftwood branch: free (I found mine after a roadside tree trimming)
- Black screw hooks: about $1.25 for a two pack
- Macrame cord or pre-made hangers: $3 to $5 if you buy them, less if you make them yourself
- Small terracotta or plastic pots: $1 each at the dollar store
- Pothos or trailing ivy plants: $4 each at a garden center, or take cuttings from a friend
- Old wooden beam or pallet plank: free from a neighbor’s curb
- Natural twine and rope spools: $2 each at thrift stores, or inherited from a relative who used to craft
The wooden beam shelf in the photo came from an old pallet that a neighbor left outside. The twine spools were from a closing craft shop, but you can also snag them at estate sales. Total cost for the whole wall display? Around fifteen dollars, and most of that was plants.
How to Make a Simple Macrame Plant Hanger for Complete Beginners
The knot you need is a basic square knot, or honestly, you can just tie loose knots down the sides and adjust as you go. Cut four strands of cotton cord, fold them in half, and tie the middle around a ring or directly onto the driftwood branch. Then pull the strands down along the side of the pot and knot them together underneath the bottom edge. It doesn’t need to be perfect. In fact, the uneven, hand-tied look matches the whole rustic vibe.
I have no background in macrame. I watched a two minute video and then figured it out by pulling strands and adjusting. If I can do it, you absolutely can. For this display I used store bought hangers because I was short on time, but homemade ones work beautifully too. The photo shows woven hangers with a bit of texture, and you can get that same look by using three strands per group instead of two. Just keep the pots small so they don’t pull the branch down.
Styling Trailing Vines on a Driftwood Wall Display
Trailing vines are the best choice for hanging planters. In the photo you can see small potted plants with leaves that spill over the edge. Pothos is my go to because it grows fast and forgiving. If you want the exact look, keep the pots small and close to the branch so the hangers don’t tangle. Mix knotted hangers at slightly different heights. That asymmetry is what makes the arrangement feel organic, like each vine found its own spot.
Don’t overcrowd the branch. Three or four hangers is enough. I usually put one on each side and one in the middle, with the longest vines on the outside. Water the pots a little less than normal because the macrame cradle doesn’t let much air circulate. That’s a real tip, not a guess. I killed a fern that way once.
How to Style a Wooden Beam Shelf With Twine Spools
That wood plank below the branch isn’t actually a functional shelf. It’s a scrap beam mounted flush to the wall, and it just happens to look like a ledge. On top of it, I stacked natural fiber twine and rope spools in different shades of beige and undyed cotton. The warm tones break up the white wall and tie the whole thing together. I like to stack them messily, not in a neat row. Let one spool lean against another. Nestle a tiny ceramic vase between them if you want.
This is one of those styling details that looks random but is actually thought out. The eye moves from the branch down to the beam, then across the spools, and back up to the plants. If you don’t have twine spools, you can use old books wrapped in twine or even a stack of rusted tin cans. The point is to fill that lower space with something natural and textured.
Where to Find Free Driftwood and Branches (and How to Prep Them)
Naturally, you can buy driftwood online, but that misses the whole point of budget farmhouse decorating. Look near rivers, lakes, and beaches after a storm. In dry climates, check hiking trails or even your own backyard. Always pick dead wood, never break it from a living tree. Before bringing it inside, let it dry in a garage or under a porch for a few days. I once skipped the drying step and found tiny bugs crawling out a week later. Not great. Now I bake small branches in the oven at the lowest setting for an hour, or freeze them in a big zip bag for two days to kill anything hiding inside.
If you find a branch that’s still damp, give it a week to cure. Then brush off loose bark and give it a quick sand if the ends are sharp. You don’t need to seal it with anything, but a thin coat of matte varnish can keep the color from fading. I usually leave it bare though. The wood will take on a lovely gray tone on its own.
And that’s the whole project. Free branch, cheap hooks, a few hanging plants, and a pile of twine spools. The finished wall looks like something from a farmhouse catalog, but the total cost was probably under fifteen dollars. If you try it, save this post for later, and don’t forget to share a photo on Pinterest. Happy making.
Leave a Comment