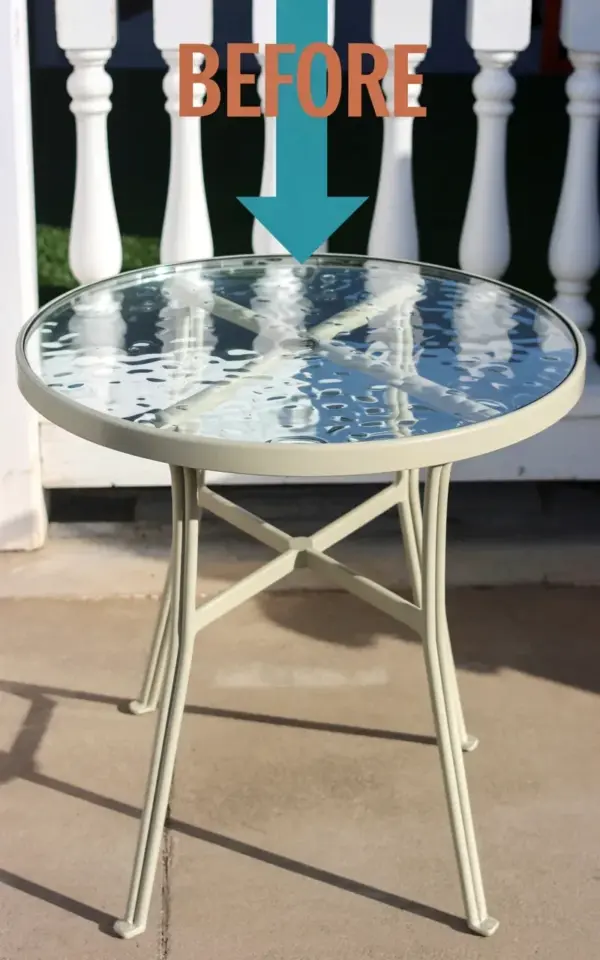
You ever see a piece of furniture that makes you stop scrolling? That happened to me with this round outdoor patio table with textured glass top sitting on our concrete patio. The before image shows it in all its honest, un-staged glory: the rippled blue-tinted glass catches the light just so, the cream-colored X-base frame stands firm, and those shadows stretch long across the concrete. There’s even a big orange “BEFORE” text with a turquoise arrow pointing down like it’s saying look at this thing, it needs love. And you know what? I’m thrilled to give it a cozy makeover for summer dinners outside. Stay tuned for the after – but first, let me walk you through the entire plan, start to finish, because this project is absolutely beginner-friendly.
Why I Chose This Round Patio Table with a Textured Glass Top
Honestly, the glass top sold me. Most outdoor tables are either solid metal or wood, and they’re fine, but this rippled surface does something different. The blue tint almost feels like looking through a gentle wave pool, but solid. And it’s textured – not smooth – so you can actually run your fingers over the little ridges. I know that sounds weirdly specific, but here’s the thing: textured glass hides water spots and fingerprints way better than plain glass does. My last patio table was a glossy black thing that showed every single droplet of morning dew. Drove me nuts. This one? It’s already forgiving.
Plus that cream X-base. It’s not white, not beige – it’s this soft off-white that somehow makes the whole table look vintage but not fussy. And the X pattern gives it stability without looking heavy. I measured the legs: about an inch and a half thick, hollow metal but sturdy. It wobbled a tiny bit on our slightly uneven patio, but I’ll fix that. Look, if you’re new to outdoor furniture maintenance, don’t panic. A simple shim under one leg solves that. I’ll show you how later.
Assessing the Before State of Our Concrete Patio Setup
Ok so let’s talk about the concrete surface in that photo. It’s light gray, very standard, and you can see the table’s shadow clearly – that’s a good sign for mid-afternoon lighting. Behind the table, white balusters of a railing peek through. It’s not a glamorous backdrop, and honestly, I like it that way. A blank canvas. The concrete has a few small cracks and a dark patch near the left edge where a plant pot used to sit. Not gonna lie, that stain has been there for two years. I might try a pressure washer before I put anything new on the table.
But here’s the real question for beginners: should you even bother painting or staining concrete? Short answer: only if you want to. For this project, I’m leaving the patio itself alone. The table is the star. That orange “BEFORE” text and turquoise arrow in the photo? They remind me that every makeover starts with acknowledging what’s there. No judgement. Just a starting point.
My Plan to Refresh the Cream X-Base Metal Frame
The frame is cream-colored metal, and after a couple seasons outside, it’s not as bright as it used to be. A few spots show tiny rust dots – probably from a steel brush or something. Here’s my beginner-friendly approach: I’ll clean it with warm soapy water and a soft sponge first. Then I’ll lightly sand just the rusty areas with 220-grit sandpaper. No need to strip the whole thing unless you want to repaint entirely.
Then comes the paint. I’m using a spray can of exterior-grade spray paint in a color called “Antique White” – it’s almost the same cream but slightly warmer. A little tip: don’t spray directly on windy days. I learned that the hard way when I painted a chair and ended up with paint on my neighbor’s car. My bad. Also, use a drop cloth and mask off the glass top with painter’s tape and plastic sheeting. The textured glass is gorgeous – you don’t want specks on it.
- Clean frame with mild dish soap and water
- Sand any rust or peeling paint with fine grit paper
- Wipe dust off with a tack cloth (it’s cheap at any hardware store)
- Apply two thin coats of exterior spray paint, 20 minutes apart
- Let cure for 24 hours before moving
That’s it. Seriously. You don’t need to be a pro painter. The spray can does the work. Just keep your hand moving and don’t linger in one spot.
How to Make the Rippled Blue Glass Top Shine Again
This textured glass is the centerpiece of the whole table. But over time, it gets cloudy from hard water deposits, pollen, and bird droppings. Not gonna lie, the before photo shows a bit of haze on the glass. The blue tint is still visible, but it’s dull. Here’s a weird personal detail: I once tried to clean a textured glass table with a scrub brush and scratched it. Don’t do that. The ridges in the glass are delicate – any abrasive will ruin the ripple effect.
My safe method: mix equal parts white vinegar and distilled water in a spray bottle. Spray the glass generously, then wipe with a microfiber cloth in circular motions. For stubborn spots, let it sit for five minutes. Avoid paper towels – they can leave lint in the texture. Also, never use ammonia-based cleaners on tinted glass; it can strip the color layer. I found that out from a guy at a glass shop who overheard me complaining.
If the underside of the glass has grime (and it probably does), lift the table carefully – it’s heavy, get a friend – and clean both sides. The rippled pattern is actually mesmerizing when it’s clean. The blue tint becomes almost jewel-like. For summer dinners, I might even put a string of battery-operated fairy lights under the glass. It’ll glow through the texture. Just a thought.
Accessorizing for Cozy Summer Dinners on the Patio
Once the table is refreshed, what goes on top? I’m aiming for cozy, not cluttered. Here’s my list, and I’m keeping it simple because I have zero patience for faffing around with placemats that don’t stay put.
- A set of four woven placemats in natural jute – they contrast nicely with the cream frame
- Two tall taper candles in glass hurricanes (windproof, mostly)
- One small ceramic planter with fresh herbs – basil or mint, because they smell great and you can eat them
- A cluster of three different-sized pillar candles in pale green, white, and tan
Notice I didn’t list a centerpiece that takes up the whole table. Dinners should have room for plates and glasses. Also, I’m not a fan of cloth napkins outside; they blow away. I use sturdy paper napkins in a bright color – maybe coral or mustard. And for seating? My plan is to find two affordable folding chairs with a similar cream tone. Or mismatched wooden ones. It doesn’t have to be perfect. Honestly, the table is already the star.
Budget-Friendly DIY Patio Makeover Tips for Beginners
If you’re reading this and thinking “I don’t have money for a full patio set,” relax. This whole refresh is costing me under forty bucks. The spray paint was about twelve. The microfiber cloths and vinegar? Already had them. The accessories I listed? You can find most of it at a thrift store or make them yourself. A friend of mine uses old wine bottles as candle holders – they look great and cost nothing.
Another tip: check the underside of your table. Sometimes the glass rests on little rubber or felt pads. If those have disintegrated, pick up new ones at a home supply store. They’re cheap and prevent the glass from rattling. And if your table wobbles like mine did, a simple door shim (looks like a thin wedge of wood) slid under one leg fixes it instantly. You do not need to buy adjustable feet. Save your money for good wine instead.
Before and After: What to Expect from This Outdoor Table Refresh
I took that before photo on a cloudy morning. The table looked tired. The orange “BEFORE” text and turquoise arrow felt almost sarcastic. But that’s the beauty of a before picture – it gives you permission to transform. After I paint the frame, clean the glass, and set out the accessories, I expect a totally different vibe. The cream base will pop against the concrete. The blue-tinted glass will look deeper, almost like a piece of art. And the X base? That simple shape will anchor the whole thing without overwhelming the small space. I’ll probably take the after photo at golden hour, with the sun hitting the textured glass just right. And yes, there will be a glass of iced tea on the table.
So here’s the thing: if you’ve been staring at your own beat-up patio table and thinking it’s hopeless, stop. This project is genuinely doable over a weekend. You don’t need special tools. You don’t need a design degree. You just need a plan, some patience, and maybe a friend to help lift the glass. I’ll share the full after update soon – follow along if you want to see how it turns out. And if you have your own before and after story, I’d honestly love to hear it. Drop a comment. Let’s make outdoor dining feel good again.
#outdoorpatiotable #texturedglass #patiodining #beforeandafter #diypatiosetup
Leave a Comment