Why a Spiral Rose Quilt Pattern is Perfect for Fabric Scraps
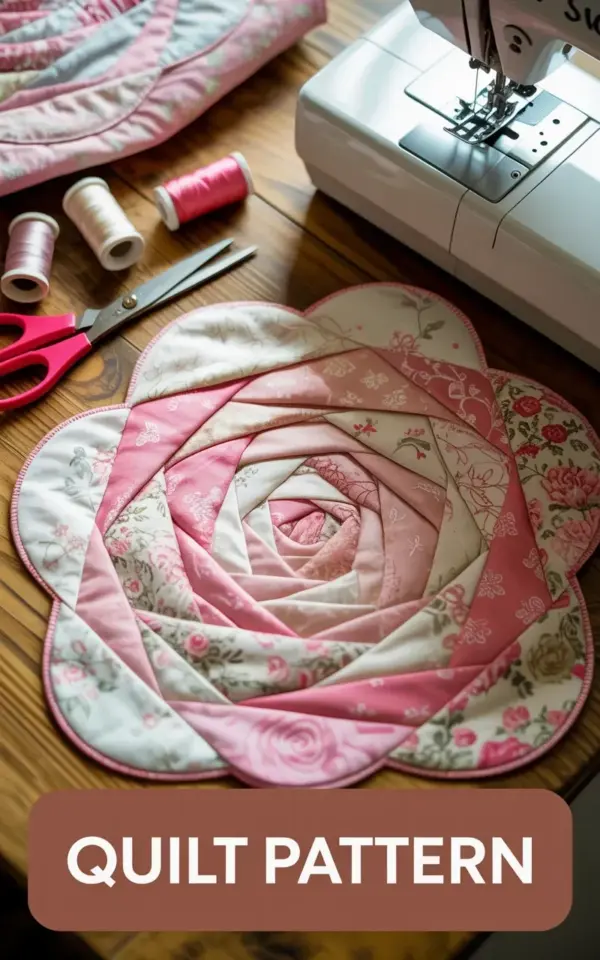
I was piecing together this handmade quilt pattern with a rose design the other day, and honestly, the whole thing started because I had a basket full of pink and cream scraps that were too pretty to toss. You know that feeling when you just want to use up every last inch of vintage fabric without buying anything new? That is exactly where this spiral rose came from. The photo shows the petals built from layered fabric pieces, each one cut from leftover floral prints and a bit of lace I found at a thrift store for fifty cents. The red-handled scissors in the image? Those are my go-to for cutting curves, and the spools of thread (cream, blush, dusty rose) are the same ones I use for almost every sewing project. This pattern is not some fancy block you need a special ruler for. It is just a spiral, really, with raw edges tucked under as you go. Here’s the thing: you can make it from almost any scrap stash.
I know some quilters get nervous about curved piecing. But a spiral rose is forgiving. Those layers overlap, so misalignments just look like natural petal folds. And because it is scrappy, you can mix prints that would clash in a regular block. I threw in a tiny polka dot and a faded rose print from the 1970s. It worked.
Choosing Vintage Fabrics on a Budget (Thrifty Tips)
Ok so, vintage fabric does not have to mean expensive heirloom pieces from Etsy for twenty dollars a fat quarter. Not gonna lie, I have bought plenty of old sheets at garage sales for a dollar each. The pink and cream fabrics in my rose pattern came from two pillowcases that had yellowed slightly. Wash them in hot water with OxiClean, and the vintage texture softens up beautifully. Look for 100% cotton or cotton blends. Polyester blends can be harder to press, but they hold a crease if you use a hot iron and spray starch.
Here are my go-to sources for cheap vintage-looking fabric:
- Thrift store pillowcases and tablecloths (cut off the hemmed edges for the best yardage).
- Estate sale fabric stashes (people often sell whole bins for five bucks).
- Freecycling groups on social media (I once got a garbage bag of floral remnants, no joke).
- Your own closet (that floral dress you never wear? Cut it up!).
One small thing: avoid anything with heavy fraying or holes where the petals will be. You can hide some imperfections in the spiral center, but the outer petals look better with solid edges. The lace in my photo came from an old curtain panel. I ripped the lace strip off, washed it, and used it as an accent between the cream petals. That cost me exactly zero dollars.
Step by Step: Piecing the Pink and Cream Petals
I am going to walk you through how I built the rose in the photograph, but keep in mind this is a loose process. You do not need a printed template. Start with a circle of muslin or any neutral base, about ten inches across. Then cut strips or irregular shapes from your pinks and creams. I used mostly pink for the inner petals and cream for the outer ones. The spiral effect comes from placing each piece so it overlaps the previous one, like shingles on a roof. I worked in a clockwise spiral, starting at the center.
Honestly, the first few petals were wonky. I just pinned them in place and sewed a narrow seam, raw edges hidden under the next petal. The red-handled scissors in the picture are for trimming excess fabric as I go. They are cheap Fiskars, not fancy, but sharp enough. I used a regular presser foot on my machine, nothing special. For the lace detail, I tucked a strip of that old curtain lace between two cream petals near the outer edge. It added a soft, lacy shadow that shows up nicely in the photo.
A weird little aside: I always keep a small bowl of water and a Q-tip beside me when I do this. Why? Because sometimes the vintage fabric has a grain that wants to curl, and a dab of water helps it lay flat without ironing every two seconds. Try it, it works.
The Tools I Actually Used (And What You Can Skip)
Look, the photo shows my setup on a wooden table: red-handled scissors, a few spools of thread (the white spool in the background is just regular Gutermann), and a sewing machine that is barely visible. But here is the truth: you do not need a fancy quilting machine. I used a 1980s Singer that cost me forty bucks on Craigslist. It does straight stitch and zigzag, that is it. The spiral rose only requires straight stitch, so any machine works.
What you do need:
- Sharp scissors for cutting curved shapes. The $8 pair from the craft store is fine, but keep them dedicated to fabric only. No paper cutting.
- Pins with flat heads (the glass-head ones are nice but the cheap plastic ones also work, just do not iron over them).
- A seam ripper. I have one that belonged to my grandmother, and yes, I have used it multiple times on this rose. Because sometimes you sew a petal in the wrong order and have to rip it out. That is real.
- Thread that matches your darkest fabric. I used a medium pink thread for everything. The stitches get hidden under the next petal anyway.
What you can skip: a walking foot, a cutting mat (you can use a piece of cardboard), and any specialty rulers. Seriously. Do not spend money on things you will not use again. This is a budget-friendly sewing project, not a quilting competition.
Adding Lace Details for a Soft Cozy Feel
The lace on my rose is not sewn into every petal. I placed it only on two outer sections, just to give a hint of texture. Vintage lace can be delicate, so I used a short stitch length (2.0) and stitched right along the edge. It puckered a tiny bit, but that adds to the cozy, handmade look. If you do not have lace, try using a strip of sheer fabric or even a bit of ribbon. I have also seen people use crocheted doilies cut into petals, but that is a more advanced version.
One tip: press the lace before you sew it. I forgot to do that on my first attempt, and the lace wrinkled in a weird way. A hot iron and a damp cloth sorted it out, but it was annoying. The photo shows the lace lying flat because I finally remembered to press. That little bit of effort makes the overall rose pattern look intentional, not messy.
Beginner Friendly Quilting Tips from This Project
If you are new to quilting with fabric scraps, start with a small rose, maybe six inches across. The one in the photo is about twelve inches, and it took me an afternoon. Do not stress about perfection. The spiral design hides mistakes better than any other pattern I have tried. Another thing: use a neutral background fabric so the rose pops. In the photo, you can see the wooden table is the background, but if you mount this on a quilt, use a cream or pale pink backing.
I also recommend basting the whole rose to a piece of batting and backing fabric once you finish piecing. That turns it into a mini quilt or a cushion cover. I am thinking of making three more roses and joining them into a small wall hanging. It is a great way to use up those odd-shaped scraps that never fit into a regular block. And honestly, the quiltinginspiration comes from just playing around with fabric. You do not need a pattern book.
One last thing: I keep all my thread spools in a repurposed tin cookie box. The ones in the photo are pink and cream, but I have a thousand other colors. It is a system that works for me because I can grab the thread I need without rummaging. Yes, I am that person who labels the tin with a Sharpie. Do not judge.
Conclusion: Try This Rose Pattern with What You Already Have
This handmadequilt rose pattern is the kind of project that feels special but costs almost nothing. You probably already have the fabric scraps, thread, and a pair of scissors. The rosequiltpattern is forgiving, the vintagefabric adds character, and the whole sewingproject can be finished in a few hours. If you want to see more of my quilting adventures, I share tips and patterns on my blog regularly. Grab your red-handled scissors and give it a try. You might surprise yourself.
#handmadequilt #rosequiltpattern #sewingproject #quiltinginspiration #vintagefabric
Leave a Comment