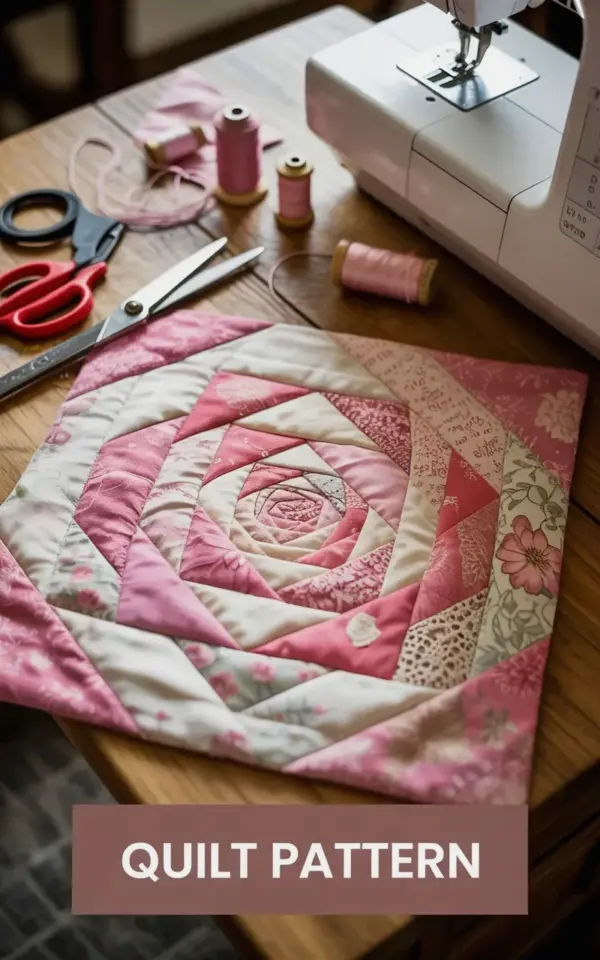
There’s a pile of fabric scraps on my table right now, a mix of faded pinks and cream florals that looks like someone raided a 1950s sewing basket. This handmade quilt pattern started as a simple spiral, and honestly, it’s the most satisfying beginner project I’ve worked on in years. The rose design in the photo, all those layered petals spreading outward on the wooden table, is what we’re making today. You’ll see the red-handled scissors and the spools of thread scattered around in the picture, that’s the real setup, no staging, just a Saturday afternoon with coffee.
Why a Rose Spiral Quilt Pattern is Perfect for Beginners
Look, I’ve tried starting with complex geometric quilts and it’s a fast way to feel frustrated. The spiral rose is different because there are no corners to match, no perfect points to line up, and no math that requires a calculator. You’re just building a shape that grows naturally, one piece at a time, like a flower unfolding.
This particular handmade quilt pattern uses what quilters call the “crazy quilt” approach, but simplified. You’re not following a grid, you’re following a curve. Each fabric scrap gets pinned to the previous one, stitched, then pressed flat. The imperfections become the petals, they’re supposed to look slightly rustic and vintage.
Gathering Your Fabric Scraps and Supplies
Before you touch a single piece of fabric, raid your stash for anything pink, cream, or even a soft dusty rose. The best part of this project is that the fabrics don’t need to match perfectly, they just need to belong to the same color family. Mix in a floral print, a solid, maybe a piece with tiny lace detailing if you have one.
- Pink and cream cotton scraps in various shades, nothing too heavy like denim
- Red-handled scissors for cutting (they’re in the photo for a reason, they’re the best)
- Matching thread, a pale pink or cream works for everything
- Straight pins with glass heads so you can see them against the fabric
- A batting square and a backing piece, roughly 12 inches each to start
Here’s the thing about fabric scraps for this rose quilt pattern, you want them in odd shapes. Triangles, weird rectangles, whatever is left over from other projects. The more irregular the shape, the more organic the rose petals will look when it’s stitched together. I’m using a piece of cream fabric with tiny blue flowers in it for one section, it’s a little off-palette but it gives the rose some depth.
Laying Out the Spiral Foundation
Start with a small circle of fabric in the center of your batting, this is the heart of the rose. I used a scrap of deep pink, about the size of a silver dollar, because it anchors the whole design. Pin it down securely, then grab your next piece of cream fabric and place it so the edge overlaps the center circle by about half an inch.
The spiral pattern is really just a series of overlapping pieces that go around and around, each one slightly larger than the last. Don’t overthink the placement, hold the fabric up to the center, eyeball it, and pin it down. If it looks wonky, rotate it until the angle feels right. The photo shows how the layers build up, each piece melting into the next one like actual flower petals.
There’s no right or wrong starting point, but I like to work clockwise. It keeps my hands out of my own way and I always know which side of the seam I’m about to sew. Lay out maybe six or seven pieces before you ever thread the needle, just to get a sense of the rhythm.
Pinning and Stitching Each Petal Piece
Once you have your first ring of fabric scraps arranged, it’s time to stitch. Pin the second piece to the first, right sides together, and sew a straight line down the overlapping edge. Use a quarter-inch seam allowance, it’s chunky enough to hold everything together but not so big that it eats your fabric.
Open the piece flat and press it with your fingers (or an iron, if you’re fancy). Then lay down the next scrap, overlap it, pin it, and stitch again. This rose quilt pattern is essentially a giant game of follow-the-leader, each piece is connected to the one before it.
Honestly, the stitching part doesn’t take long, it’s the arranging that eats up your time. You’ll find yourself standing back, squinting at the shape, wondering if that one cream piece is too pale. It’s fine, it adds character. The red-handled scissors in the photo are my dedicated “fussy cutting” pair, I use them to trim rough edges right on the table without worrying about ruining the blade.
Build the Rose Quilt Layers, Then Press
Keep spiraling outward until the fabric covers the entire batting square. The final ring of pieces should extend about half an inch past the batting’s edge, you’ll trim it down later. For a 12-inch finished block, you’re looking at roughly 15 to 20 pieces depending on how big each scrap is.
When the rose reaches your desired size, press the whole thing with a hot iron. This one step makes a massive difference, it flattens all those bulky seams and makes the spiral pattern actually visible. Before pressing, it looks like a chaotic patchwork mess. After pressing, it looks like a flower.
This is also the moment to check your stitching. If there are gaps between pieces, just sew over them again. If a seam is puckered, gently pull it out and resew it. You’re learning, the stitches should be functional, not perfect.
Finishing Edges and Adding Vintage Floral Details
Trim the excess fabric and batting so the edges are square, then add a simple border or just bind it with a bias strip. For a quick weekend project, a plain cream border makes the rose pop without competing for attention. The vintage look in the photo comes from those small lace details and the slightly distressed texture of the fabric.
If you want to lean into the floral vibe, hand-stitch a few running stitches around the outer petals with contrasting thread. It’s not necessary, but it gives the piece a handcrafted feel that totally says “heirloom.” I added a tiny button at the very center of my rose, covered in pink fabric, it hides all the seam intersections and looks intentional.
You could stop here, or you could keep going and make four or six blocks to sew together into a larger quilt. Each rose takes about an hour of mindful, relaxing work. A four-block baby quilt with a rose in each corner would be a genuinely beautiful gift, and you’d have spent a lazy Sunday making it.
Beginner Sewing Tutorial Tips for a Better Result
Use pins, even if you think you don’t need them, fabric slides and shifts when you’re layering this many odd shapes. A loose pin creates a giant mess in the middle of a seam. Also, don’t be afraid to trim your seam allowances down after stitching, it reduces bulk.
For your thread, a neutral cream color will disappear into the fabric and forgive any slightly crooked stitching lines. Pink thread is visible and can actually look cute on the seam lines, but it shows every mistake. Another quick tip, set your stitch length a tiny bit shorter than what you’d use for regular sewing, it grabs the fabric scraps better.
And here’s something nobody tells you, iron every piece after you sew it. I know, it’s boring, but the difference between a quilt block that looks handmade and one that looks like a fever dream is the ironing. If you skip this step, you’ll have lumpy, bumpy petals that refuse to lie flat.
Finally, if you mess up, just unstitch it and go again. I’ve done this rose quilt pattern four times, and I took out stitches on every single one. That’s not a waste of time, that’s just sewing.
Save this project for a weekend when you have a few quiet hours and a podcast queued up. The fabric scraps pile up fast, the spiral is forgiving, and you end up with something that genuinely looks like a rose bloomed on your table. Grab those red-handled scissors, pick your first pink scrap, and just go for it.
Leave a Comment