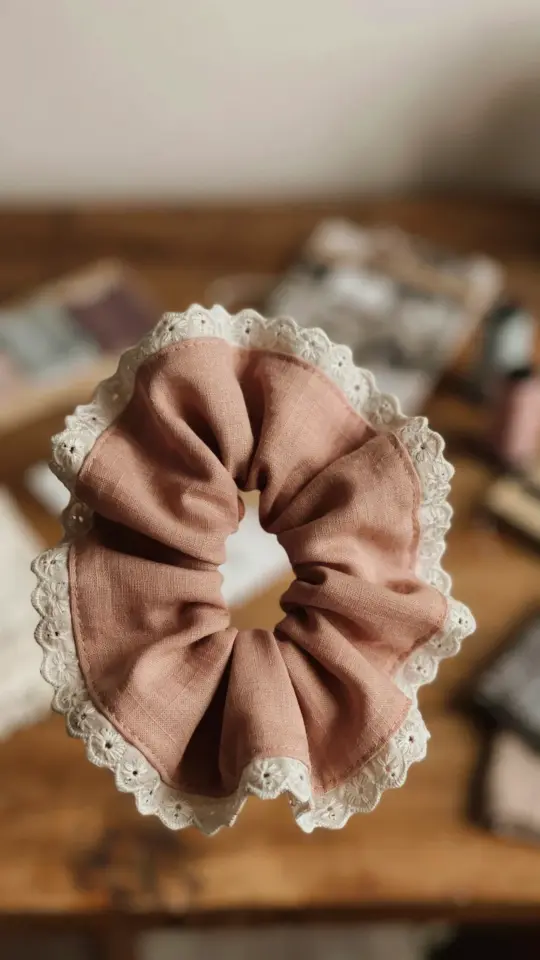
Got a pile of fabric scraps? I know I do. My sewing basket is basically a graveyard of leftover bits from past projects. But here’s the thing: those little pieces are gold for fabric scraps sewing projects. Seriously, you don’t need to buy new material every time. This quick DIY scrunchie uses a single 65 by 12 cm rectangle of remnant fabric. Add optional lace trim, and you have a cute hair accessory for pennies. Not gonna lie, I made three in one afternoon while binge watching a show. So easy.
Why fabric scraps and scrunchies are a perfect match
Scrunchies are small. That means you can use even the weirdest leftover pieces. A strip of cotton quilting fabric, a scrap of silk from an old blouse, or that one random width of linen you bought on sale. Honestly, I’ve used a piece that had a tiny stain I cut around. Perfect for zero waste. Plus, they are quick to sew. No zippers, no fitting, just straight lines and a bit of elastic. If you are trying to reduce textile waste, this is the most satisfying project. You get something wearable out of a rag.
And here is my weird little aside: I have a thing against synthetic velvets. They fray like crazy. But a scrap of cheap polyester velvet? It made a surprisingly good scrunchie. Just had to finish the edges with a zigzag stitch. Anyway, the point is: don’t judge a scrap by its fabric content.
What you will need (on a budget)
You probably already own most of this. I am a cheapskate, so I always look for alternatives. Here is the list with my honest, broke-friendly opinions:
- Fabric scrap: 65 cm long by 12 cm wide. Any woven or knit fabric works. Old t-shirts are perfect. Even a worn out scarf. No need for fancy fat quarters.
- Elastic: About 20 cm of 1 cm wide elastic. I cut it from a giant roll I bought at a garage sale for a dollar. But you can reuse elastic from worn out underwear or old pajama pants. Seriously, it works.
- Sewing machine or needle and thread: I prefer a machine because it is fast, but hand sewing is totally doable. It will just take an extra ten minutes. And you need basic thread. Nothing special.
- Safety pin: To thread the elastic through the casing. If you lose them like I do, a small hair clip works too. Or a unfolded paperclip.
- Optional lace trim: 65 cm of lace. I buy lace remnants at thrift shops for 25 cents. But you can skip it entirely. Scrunchies look fine without.
See? This is budget sewing at its core. No extra purchases required. If you have a stash, use it. If not, ask a friend for their fabric scraps. Most sewists are happy to give away little leftovers.
Step by step: sewing your zero waste scrunchie
Look, the instructions are simple. But I am going to give you the real version, with the little details that matter. Not the generic “fold in half lengthwise” nonsense. Here we go.
First, lay your fabric rectangle flat, right side up. Fold it in half lengthwise, right sides together. So it becomes a 32.5 cm by 12 cm tube. Pin the long raw edge. Sew a straight stitch along that edge, leaving about a 1 cm seam allowance. Backstitch at the start and end. Remove pins. Now you have a tube. Turn it right side out. I use a chopstick to push the corners out. A chopstick from takeout. Yes, I hoard them.
Next, fold one short end of the tube inward about 1 cm. Slide the other short end inside that folded end, like you are nesting two tubes. Pin them together. This creates a ring. Sew around that opening, but leave a gap of about 3 cm unsewn. Why? So you can insert the elastic. I always forget this and have to rip out stitches. Don’t be me.
Now attach the safety pin to one end of the elastic. Fish it through the entire tube casing. It will bunch up the fabric. Pull both elastic ends out through the gap. Tie them in a double knot. Not a slip knot. A double knot. Trust me, slip knots come undone after two wears. Tuck the knot inside the casing. Then stitch the gap closed by hand or machine. Done.
If you are adding lace: before sewing the tube into a ring, pin the lace along the seam of the tube (the bottom edge). Sew it on as you close the tube edges. Or just hand tack it later. I like it tacked because it looks neat.
Add a lace trim for extra flair
Ok so I love a basic scrunchie. But sometimes you want a little something. Lace trim is cheap. You can buy a yard of crochet lace for under a dollar at discount stores. Or cut lace from an old curtain. I’ve done that. Cut a segment 65 cm long. Align it with the bottom edge of your fabric tube, right sides together. Sew along the edge. Then flip the lace down. Now when you turn the tube right side out, the lace peeks out from the seam. Very shabby chic. Not essential though. If you are in a hurry, skip it.
Alternatively, use a scrap of ruffled trim. Or even bias tape in a contrasting color. Honestly, I once used a strip of ribbon that came off a gift box. It frayed horribly but looked “rustic”. Whatever that means.
Tips for absolute beginners (and anyone who hates measuring)
I am not a perfect sewer. My stitches are wobbly. So here are real tips that helped me.
Do not stress about the 65 cm measurement. If your scrap is a bit shorter, say 50 cm, it still works. The scrunchie will just be a little less poufy. Still cute. If it is longer, even better. More volume. The 12 cm width is also forgiving. 10 cm works. 15 cm is fine. Just adjust the elastic length accordingly. For a 10 cm wide tube, use 18 cm elastic. For a 15 cm tube, use 22 cm. I eyeball it. If you are a perfectionist, measure. If not, just go with the vibe.
Use a longer stitch length. I set my machine to 3.5 mm. Shorter stitches create a stiff casing. Longer stitches let the fabric gather nicely. Also, press your seams open. I used to skip ironing. Now I see that a quick press makes the scrunchie lie flat and look professional. But you do you.
One more thing: if your fabric is slippery, like satin, pin generously. And use a walking foot if you have one. Otherwise just go slow. Not gonna lie, I have made a satin scrunchie that came out twisted because I rushed. Wearable but slightly janky. Still counts as a win.
Other easy projects for leftover fabric
Once you make a few scrunchies, you will have even smaller scraps. What then? Here are three ideas that require even less material. All are budget sewing friendly.
Fabric coasters. Cut two 10×10 cm squares from matching scraps. Sew three sides, turn, topstitch. Done. They protect tables and use ugly leftover prints. I have a set made from old curtains.
Drawstring pouches. Two rectangles sewn together with a channel for a ribbon. Great for storing your scrunchies. Seriously, you can use a scrap as small as 15×20 cm. I use them for earbuds and charging cables.
Patchwork bookmark. Sew strips of fabric together, back with a piece of felt, and you have a quick gift. My weird detail: I made one from a scrap of vintage bedsheet. It has a faint floral pattern from the 1970s. I love it even though the edges are a bit raggedy.
All of these fit the zero waste craft mindset. You are not throwing anything away. You are making useful objects from material that would otherwise rot in a landfill. Feels good, honestly.
Conclusion
So next time you finish a sewing project, do not toss that tiny rectangle of leftover fabric. Turn it into a scrunchie. It costs nearly nothing, takes minutes, and gives your hair a break from harsh elastics. Plus, you can match your scrunchie to whatever you are wearing. I have a whole drawer of them now. Try it with an old t-shirt scrap first. If it comes out wonky, who cares. It is just fabric. And you saved it from the trash.
Got your own favorite scrap project? Leave a comment below or tag me in your photos. I would love to see what you make from your leftover bits.
#fabricscraps #sewingtutorial #diyhairaccessories #budgetsewing #zerowastecraft
Leave a Comment