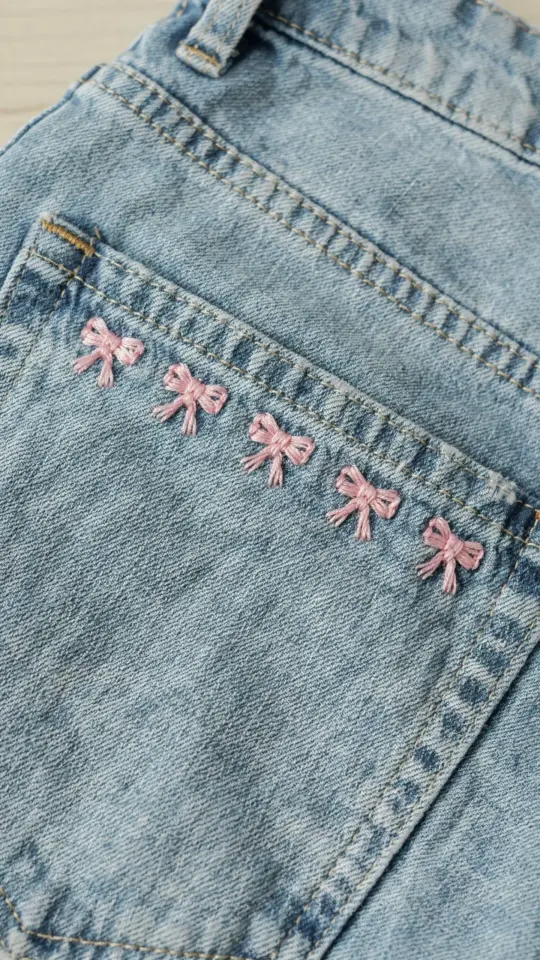
So you finally decided to add some cute little bows to your favorite pair of jeans. You grabbed your needle, some colorful thread, and started stitching away. But then you step back and notice they look wonky. One is too close to the pocket. Another is practically touching the seam. The spacing is all off. Honestly, I see this happen all the time when people are stitching cute little bows on denim. The good news? It’s an easy fix. And it doesn’t involve a ruler or any measuring tape.
The Biggest Spacing Mistake Beginners Make
Here’s the thing. Most beginners just eyeball it. They pick a spot, stitch a bow, then guess where the next one should go. But denim has a lot of visual structure already. Pockets, seams, belt loops, even the hem. If you ignore those existing lines, your bows will look disconnected from the garment. Like they were slapped on as an afterthought.
I once stitched a row of tiny bows on a thrifted denim jacket. I was so proud of my work until I wore it outside and realized the third bow was practically hovering in midair, miles from anything else. It drove me crazy. Don’t be like me. Use the construction of the jeans as your built-in grid.
Why You Should Use Denim Seams as a Guide
Seams are natural break points. They create visual boundaries that the eye already follows. When you align your bows with those seams, everything looks intentional. Even if your spacing isn’t perfectly mathematical, the relationship between the bow and the seam gives the design a cohesive rhythm.
I’m not a fan of measuring tapes for embroidery. They feel too rigid, too school-project-ish. Instead, I use the distance between the pocket edge and the side seam as my unit. Let’s say that gap is two inches. I’ll place my first bow one inch from the pocket, then the next bow one inch from that, and so on. Simple. No numbers required.
How to Mark Your Bow Positions Without Measuring
Ok so here’s the practical part. Grab a washable fabric marker or a very light pencil. First, identify your reference points. Look at the back pockets. The center seam. The front pocket openings. Now imagine a straight line running parallel to the waistband.
Start at one pocket corner. Place a small dot at a distance equal to the width of your thumb or a finger joint. That’s your first bow location. Then use the same finger-joint method to add the next dot. Repeat until you reach the seam. The beauty of this method? You’re using your own hand as a ruler. It’s approximate but consistent.
- Use the pocket opening as a starting point.
- Place dots using a finger width, not a measuring tape.
- Double-check by looking from a few feet away before stitching.
- If you’re placing bows on a back pocket, align them with the pocket’s top edge.
One weird trick I picked up: take a photo of the jeans with your phone. Then draw the bow positions in a photo editor (or just imagine them). That gives you a quick preview without committing thread.
Choosing the Right Embroidery Stitch for Denim
Not all stitches behave the same on thick denim. The fabric is dense, so you need a stitch that shows up clearly without taking forever. For little bows, I swear by a simple lazy daisy or a straight stitch cluster. Lazy daisy gives that round loop shape fast. Straight stitches create a neat X or V for the bow’s center.
But here’s a minor gripe I have: some tutorials recommend satin stitch for bows on denim. Don’t do it. Satin stitch on denim is a pain. The needle drags, the thread snags, and you end up with a lumpy mess. Stick to stitches that only go through the fabric a few times per bow. A single bow should take maybe 30 seconds to stitch once you’re comfortable. That’s the sweet spot for a beginner embroidery project.
Testing Your Thread Tension on Thick Fabric
Denim doesn’t give like cotton or linen. Pull your thread too tight and the fabric puckers. Leave it too loose and the bow looks floppy. I learned this the hard way on a pair of black skinny jeans. The bows looked like sad little mushrooms because the tension was uneven.
Here’s what I do now. Before starting on the visible area, make a test bow on an inside seam or the hem. Use a few different tensions. Find the one where the stitch sits flat without denting the fabric. Also, use a shorter thread length. Long threads on denim tangle easily because the friction is higher. I cut my floss to about 18 inches max. Not gonna lie, I also spit on the thread sometimes to reduce friction. Gross but effective.
What to Avoid When Stitching on Pockets and Seams
Pockets are tempting targets. They’re already decorated with stitching, so adding a bow seems natural. But pocket fabric is often doubled over. You can accidentally stitch through both layers and trap the pocket opening. Suddenly you can’t fit your phone in there anymore. I’ve done it. Had to rip out an entire row of bows with a seam ripper. Not a fun evening.
Another mistake: stitching too close to the raised seam edge. The needle hits the thick seam fold, bends, and sometimes breaks. Use a thimble if you’re going near those areas. Or skip that spot entirely and place the bow a quarter inch away. Your needle will thank you. And honestly, most people won’t notice the quarter-inch gap, but they will notice a bent needle.
Finishing Your Embroidery So It Lasts Through Washes
Denim gets washed. A lot. You want those bows to survive. The common mistake is not securing the back of the stitches well enough. On denim, loose ends will unravel quickly because the fabric is so textured and moves in the wash. I always tie a knot after each bow, and then weave the tail back through four or five stitches on the underside.
Also, consider using a iron-on stabilizer on the inside of the jeans. Just a small square behind each bow. It prevents the thread from rubbing against other clothing in the wash. Or if you’re lazy like me, you can simply turn the jeans inside out and toss them in a delicates bag. That reduces friction. I’ve had bows last two years with that method. The jeans themselves wore out before the embroidery did.
So here’s the soft bottom line: the mistake is easy to avoid. You just need to see the seams as your friends, not obstacles. Pick a simple stitch, test your tension, and place your bows using the existing lines of the garment. Your future self will thank you when you pull those jeans out of the dryer and the bows are still perfectly spaced. Have you tried this technique on a pair of old jeans yet? Drop a comment if you give it a shot. I’d love to know how it turns out.
#embroideredbows #embroiderytutorial #embroidereddenim #upcycledclothing #beginnerembroidery
Leave a Comment