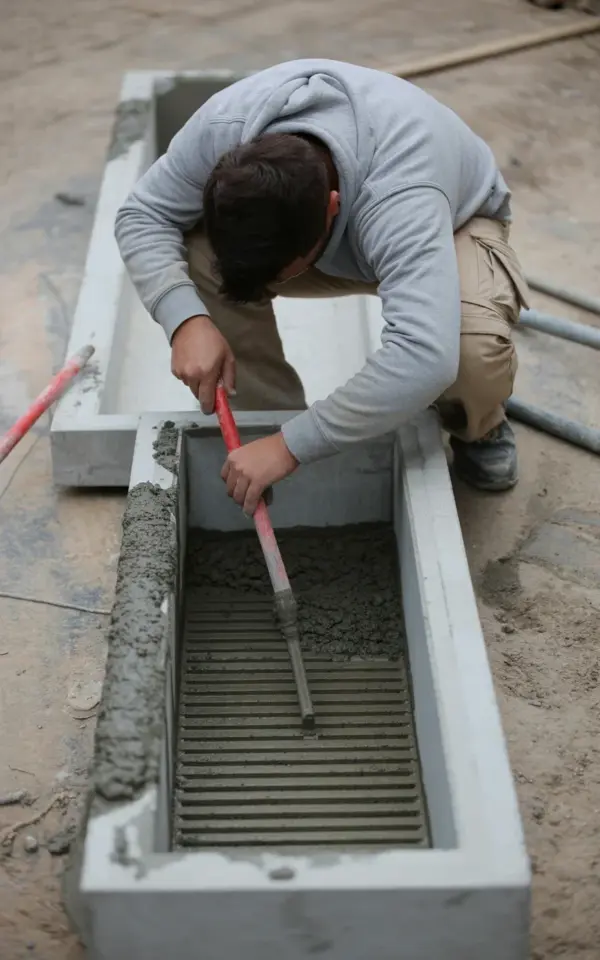
A red finishing tool drags through a fresh concrete joint, cutting a clean line into the gray surface. The worker crouches low, his light gray sweatshirt blending into the dusty backdrop, while the rectangular channel in front of him shows off its new ribbed interior. This is the exact moment where a cracked concrete drainage mess turns into a functional part of the yard, and honestly, it’s my favorite stage of any backyard drainage project.
That mid-project shot you see with the ribs and the fresh concrete? It wasn’t luck. It was sixty percent prep work, thirty percent patience, and ten percent swearing under my breath when the mix started to set too fast. Whether you are looking to fix an eroding ditch or just want a tidy runoff line, there is a way to approach this that actually holds up.
Here are five concrete drainage ideas that I would steal for any backyard drainage transformation. Each one is a distinct theme you can adapt for your own home improvement project.
## The Prep Work That Saves Your Drainage Channel
Before you even think about mixing concrete, you need to dig out the old structure completely. I am not talking about a quick scrape. No, you have to remove the crumbled edges, the loose gravel, and all the packed dirt that built up over the last decade. The actual channel is only as good as the ground it sits in, and if your base is spongy, the new concrete will crack in a season.
We laid a compacted gravel base, which cost about forty bucks and took an afternoon to tamp down. It was boring, sweaty work, but it created a solid foundation that would not shift when the rain came. Here is a short checklist of things to obsess over during this phase:
– Verify the slope with a level. You need at least a quarter-inch drop for every foot of channel.
– Tamp the gravel in small layers, not in one big pile.
– Soak the surrounding soil if it is dry, so it doesn’t suck the moisture out of your fresh concrete.
– Use wooden stakes to brace your forms. Trust me, they will bow if you forget.
Skipping this step means you will be back here in eighteen months with a chipping hammer, fixing a mess that could have been avoided. The prep is not glamorous, but it is the difference between a joint tap that feels solid and a hollow thud that spells trouble.
## Shaping the Ribbed Runoff Line
When people ask about the ribbed pattern on the inside of the channel, they usually assume it is a pre-fabricated insert. It isn’t. We used a steel trowel to drag perpendicular lines across the wet concrete, creating small ridges that slow water down and prevent the flow from gaining speed. It’s a simple technique that a lot of DIYers skip, and then they wonder why their drainage channel erodes at the end.
The timing has to be spot on. If the concrete is too wet, the ribs will just slump back flat. If it is too dry, you will leave rough drag marks that pull out the aggregate. You want the concrete to be stiff enough to hold its shape but soft enough to accept the imprint.
I remember leaning over the form with the red tool, trying to keep my lines perfectly straight while my knees screamed in protest. A wooden guide board helps with this. Clamp it along the top edges, run the tool along the guide, and you get a professional-looking finish without needing steady hands.
## The Grate Details That Hide the Drainage Channel
Once the concrete cures, you have to decide on the cover. A bare channel works, but it catches leaves, kid’s toys, and the occasional unfortunate frog. A grate, on the other hand, makes the whole thing look intentional, like you actually planned for the water to go there.
We used a heavy-duty polymer grate for this backyard drainage project. It’s cheaper than cast iron, easier to cut, and it won’t rust over time. The frame has to be set into the concrete while it is still wet, which is a pain because you have to level it and keep the channel perfectly open at the same time.
Take your time with the corners. A slightly crooked grate will catch your eye every single time you walk past it. And you will walk past it a lot. Nobody notices a perfectly straight grate, but they will absolutely notice a skewed one.
## Matching the Concrete Channel to Its Neighbors
Here is the thing about fresh concrete: it is bright, glaring white when it dries. That looked terrible against our older, weathered patio. The new drainage channel stood out like a new sneaker in a row of muddy boots.
We fixed it with a concrete tint mixed in during the dry stage. A light gray oxide pigment, just a handful for an eight-foot channel, knocked the starkness down immediately. Now the ribbon of fresh concrete sits quietly against the old slab, doing its job without screaming for attention.
If you are pouring a full slab, you have more options, like exposed aggregate or a brushed finish. For a narrow channel, keep it simple. Match the surrounding color, keep the surface smooth, and let the ribbed pattern do the talking.
## Finishing the Joints Like a Professional
That red tool in the photo was a jointer, and it serves a crucial purpose. It compresses the edge of the concrete, creating a slight radius that stops chipping and spalling. Without this step, the thin edges of your drainage channel will crumble after a few freezing and thawing cycles.
Run the jointer along all the exposed top edges, both the front and the back. Do it twice if you have to. The first pass smooths the big imperfections, and the second pass polishes the line into something sharp and defined. It takes maybe fifteen minutes, but it’s the difference between a DIY job and a professional concrete project.
While you are down there, check for any small holes left by trapped air. A little mortar rubbed across the surface fills them right up. Just be careful not to smear it into the ribbed interior, because that clogs the run-off marks and defeats the whole purpose.
## Why the Water Needs a Place to Go
It is easy to obsess over the channel itself and forget the outlet. A drainage channel is only useful if the water has somewhere to discharge. Pointing the end toward a flower bed is a great way to drown your roses.
We routed ours into a dry well at the edge of the property, a simple pit filled with gravel and covered with landscape fabric. The water drains into the ground slowly instead of pooling against the foundation or washing out a path across the lawn. It is not exciting, but it prevents the kind of damage that makes you regret buying a house with clay soil.
Check your local regulations before you start digging here. Some areas have strict rules about directing water onto neighboring properties or into storm drains. Get that wrong and the city will make your life miserable.
The whole backyard drainage fix, from the cracked removal to the ribbed finish, took a solid weekend and maybe two hundred dollars in materials. It wasn’t a glamorous project, and my back hated me for a few days afterward, but watching the rain flow straight down that channel without a single puddle? That made it all worth it. The red tool is cleaned and hung up, the photo is taken, and the curb appeal is officially upgraded. What are you fixing in your backyard this weekend?
Leave a Comment