There is a very specific kind of quiet that comes with arranging flowers by hand. You stand there, stems in one fist, scissors in the other, and the rest of the world just kind of fades out. I have a confession to make. I am not a professional florist. I am someone who buys grocery store blooms on a Sunday afternoon and refuses to let them die in the vase without a fight. This chrysanthemum bouquet tutorial is for you if you have ever stared at a bundle of flowers and felt completely overwhelmed. Good news. You have everything you need to fix that.
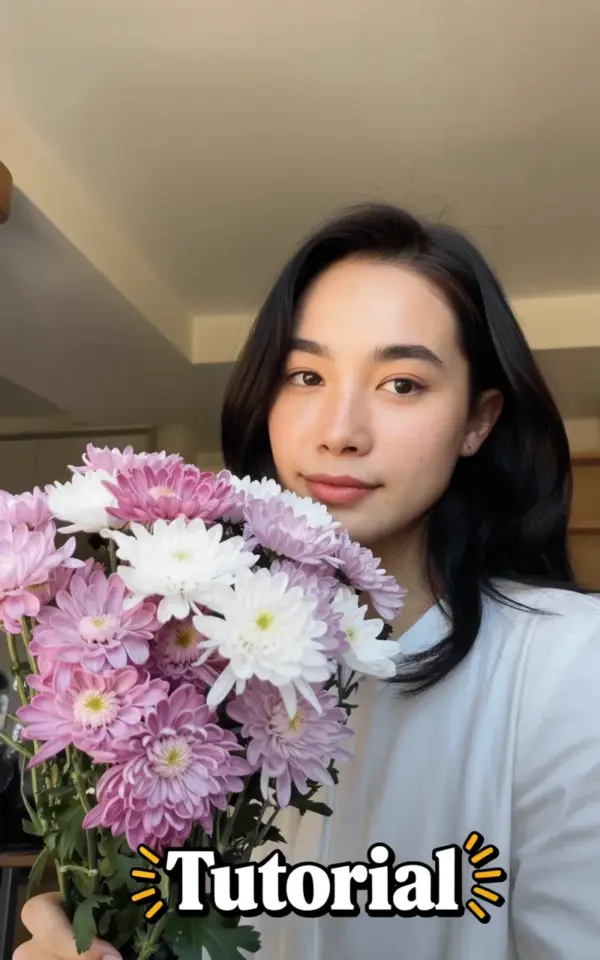
The photo that inspired this post shows a woman holding a loose, natural bouquet of pink, white, and light purple chrysanthemums. She is wearing a simple white long-sleeved top, and her long black hair falls over her shoulders. The background is a plain beige wall, with soft, even light washing over the scene. It looks effortless. It was not. I mean, it was easy, but it took a little bit of thinking. Let me walk you through exactly how I put it together so you can do the same in your own living room.
Why Chrysanthemums Are Perfect for Your First DIY Flower Arrangement
Chrysanthemums do not get enough credit. Honestly, they are the workhorses of the flower world. They last for ages. I have kept mums alive for almost three weeks before they finally gave up. That is a long time to enjoy a bouquet you made yourself.
If you are just getting into flower arranging, mums are the best place to start. Here is the thing. They have thick, sturdy stems that are forgiving to cut. They do not droop dramatically the way some delicate flowers do. You can fuss over them, reposition them a hundred times, and they will not punish you for it. They just sit there looking round and cheerful. That resilience makes them ideal for a beginner flower arrangement.
The Loose, Natural Style: The Anti-Pod Floral Shape
You know those tight, dome-shaped flower arrangements you see at wedding venues? This is not that. This is the opposite. The loose natural style is about letting the flowers move like they might still be growing in a field. Here is the thing about these arrangements. They are forgiving because perfection is not the goal.
When I arrange flowers this way, I think about layers. I do not just shove all the blooms in at once. I start with the base, which in this case was a few stems with more greenery. Then I build up and out. I want the highest flower and the lowest flower to be separated by a decent distance. That is what creates the “airy” feeling. The purple, pink, and white chrysanthemums in the photo are not clustered together in a tight ball. They are spaced out, each one getting room to breathe.
Do not be afraid of gaps. Gaps are your friend. Think about how flowers look when they grow on a bush. There is space between the blossoms. Recreate that, and you are not just arranging, you are composing.
How to Choose Your Pink and White Color Palette With a Purple Twist
The color palette here is doing a lot of heavy lifting. Pink and white chrysanthemums are classic, but that pop of light purple changes the whole mood. It adds an unexpected coolness to what could be a very sweet, sugary look. Let me tell you, the soft light against the beige wall in the photo is what makes these colors sing. The beige is neutral, so it does not fight with the flowers.
If you want to build a similar palette, look for these shades:
- A dusty rose pink mum (not too hot, not too baby pink)
- Pure white pom pom mums that look like little clouds
- One or two stems of a soft lavender or light purple hue
- Optional but nice: a few stems of eucalyptus or any fern for texture
The secret to making this work is to use different sizes of blooms. If every flower is the same size, the arrangement looks flat. Mixing spray mums with larger football mums gives you that instant, expensive-looking variety.
The Easy Way to Condition Chrysanthemum Stems Before Arranging
Ok so, you have your flowers. What now? The first thing you should do is strip the leaves that would fall below the water line. Leaves in water rot, and rot breeds bacteria. That is what kills flowers quickly. You do not need all those leaves anyway. You have the petals for the show.
Use a sharp knife or floral shears to cut the stems at a 45-degree angle. Why a 45-degree angle? Because it gives the flower more surface area to drink water. Plain straight cuts are for lazy people. Or busy people. Either way, try to do the angle thing. Cut them immediately before you put them in the vase. A chrysanthemum stem that sits out for an hour with a dry cut will suck in air, and that air bubble blocks the water from traveling up. It is exactly like having a bubble in a straw.
A Step-by-Step Chrysanthemum Bouquet Tutorial for Absolute Beginners
Here is the actual process. I ran through this while wearing that exact style of casual white top, and not gonna lie, I felt a little bit like a lifestyle influencer. But the mechanics are simple. You just need a clean vase, a rubber band, and your prepared flowers.
One trick I learned is the hand-tied method. You hold the stems in one hand and keep adding flowers with the other. You cross the stems in a spiral pattern. It sounds complicated, but if you just keep turning the bouquet a quarter turn every time you add a stem, you will naturally build a spiral. When you let go, the bouquet stands up on its own. That is the moment it all clicks.
Once the bouquet is in the vase, step back and look. What looks empty? What looks too tall? Chrysanthemums are forgiving, so you can trim a stem shorter and pop it back in. Take a photo of your work. The camera is a great tool for seeing what your eyes miss. The selfie angle with the flowers by your face is actually a smart way to check the scale of your bouquet. If it looks good in a photo, it looks good in real life. That is science. Kind of.
Where to Place Your Finished Bouquet for the Best Light
Here is a secret nobody tells you. The flowers do not just look good. The location matters. The soft light is what makes the chrysanthemum colors pop against the beige wall. If you put this bouquet in a dark corner, the purple turns muddy and the pink looks flat.
Place your vase near a window with sheer curtains. You want that diffused, overcast-day light. The photo shows the woman holding the bouquet indoors with the ceiling visible but the light is even and warm. That is not an accident. That is the magic spot between direct sunlight and shadow. It is honestly the same lighting that makeup artists use. It smooths out the harshness and makes the petals glow.
Also, put it somewhere you will actually see it. I once left a beautiful arrangement in the guest room and forgot about it for a week. The kitchen counter or the dining room table is where it will matter most. Also, your coffee table if you are the kind of person who enjoys looking at nice things while you binge watch television. You should be that person. It is good for your mental health.
Chrysanthemum Care: A Few Notes for After You Arrange
Your bouquet is done. The hard part is over. But to get the longest life out of your mums, you need to do one simple thing. Change the water every two days. Trust me, this simple thing works wonders. You will be amazed at the difference.
Just trim about a quarter of an inch off the bottom of the stems each time you change the water. These flowers drink a lot. Keep them out of direct afternoon sun if you can, since that can wilt them faster. And remove any spent blooms promptly to encourage the others to keep going. With chrysanthemums, a little care goes a long way. I have had mums outlast my motivation to clean, and that is truly saying something.
I love that the photo shows a real person holding the finished bouquet in a selfie style. It is not a glossy studio shot. It feels realistic, like something you could achieve on your Tuesday afternoon. And you can. Just follow these flower arranging steps and make sure to save this tutorial for your next flower arrangement project. Or your next trip to the supermarket. You know, the real source of all your future allergies. Anyway, go buy those pink flowers and make something beautiful for your kitchen. You will be surprised at how good it makes you feel.
Leave a Comment