Why Cedar Works for a Floating Shelf
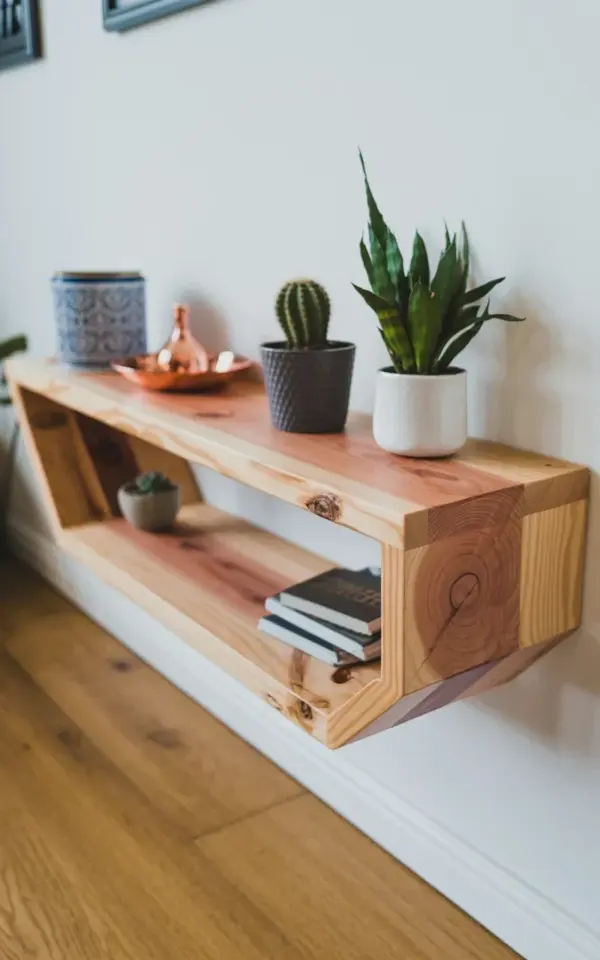
If you are looking for a weekend project that adds character without breaking the bank, this angular DIY floating shelf from cedar is a budget plant display idea you can actually finish in an afternoon. Cedar is often overlooked for small builds, but it brings both durability and a warm, natural look that painted pine just can’t match. The grain patterns and small knots in the wood give each shelf a unique personality, which is exactly what you see in the photo with the cactus and copper tray.
Unlike standard lumber, cedar resists moisture and warping, making it a solid choice for holding pots and trays near a window. It also sands smoothly and takes a clear finish well, so you can let the wood speak for itself. For a floating shelf that stays lightweight yet strong, cedar is a practical choice that doesn’t cost much.
Materials and Tools You Will Need
Gathering everything before you start saves you trips to the hardware store. For this project you need one cedar board (about 1×8 or 1×10, 4 feet long), a stud finder, a level, a drill, wood screws, and a wall anchor kit for drywall. You also need a miter saw or a hand saw with a miter box to cut the slanted bottom.
- One cedar board (1×8 x 4 ft works well for the main shelf and bottom piece)
- Miter saw or hand saw with miter box
- Sandpaper (120 and 220 grit)
- Wood glue and finishing nails
- Drill with wood drill bits
- Stud finder, level, tape measure
- Clear polyurethane or wax finish (optional)
You can find clear cedar boards at most home centers for around $12 to $18. The total project cost, including fasteners and finish, stays under $25 if you already own basic tools. That is a real budget win for a custom shelf.
Step by Step: Cutting the Slanted Bottom
The signature look of this shelf comes from the angled bottom piece that creates a geometric edge. Start by cutting your main shelf plank to 36 inches long. Then cut a separate strip of cedar about 3 inches wide and the same length. Mark a line from one end to the other at a 15-degree angle. That slanted cut gives the shelf its modern, slightly asymmetrical feel.
Use your miter saw to make that angled cut. If you don’t have one, a hand saw and miter box work fine just go slowly and keep the cut straight. Sand the cut edge well with 120 grit, then 220 grit, to remove any splinters and soften the line. The natural cedar grain and any knots will show up beautifully once you apply a light coat of clear polyurethane.
Assembling and Mounting the Shelf
Attach the slanted strip to the front bottom edge of the main shelf plank using wood glue and a few finishing nails. Clamp it in place for 30 minutes while the glue sets. This gives the shelf its visual depth and that angled profile you see in the photo. For the floating mount, you need a hidden bracket system. A simple option is to cut two small cedar blocks and screw them to the back of the shelf, then screw those blocks into wall studs.
Use a stud finder to locate studs in your white wall. Mark the spots and drill pilot holes. Attach the mounting blocks to the wall with 2.5 inch screws. Then slide the shelf onto the blocks and secure it from underneath with small wood screws. Level it before tightening everything. The result is a clean floating look with no visible brackets, perfect for a modern plant display.
Styling Your Cedar Shelf with Plants
Once your shelf is mounted, it is time to style it like the image. Start with a small cactus in a dark gray textured pot on the right side. Place a tall snake plant in a white ceramic pot next to it. A blue and white patterned container adds a pop of color and holds something low growing like a pothos or a succulent. On the left, set a copper colored metal tray to catch any drips and to hold small items like keys or a candle.
The contrast between the warm cedar, the white wall, and the green plants creates a balanced look. Keep the spacing loose so each item breathes. The slanted bottom piece draws the eye along the shelf, so avoid overcrowding. Less truly is more here.
Budget Friendly Decor Tips for Small Spaces
Floating shelves are one of the simplest ways to add storage and style without cluttering a room. This cedar shelf works especially well in a narrow entryway, above a desk, or in a kitchen corner. You can swap out the plants seasonally or use it to display a small stack of books and a ceramic vase. The copper tray adds a metallic accent that plays off the warm wood tones.
Because the whole project costs under $25, you can build two or three of these shelves and stagger them on the wall for a gallery effect. Use the same cedar for all of them to keep a cohesive look. For a truly modern feel, leave the wood unfinished or apply a single coat of clear matte sealer. That lets the natural grain and knots stay front and center.
Remember that the slanted bottom is not just decorative it also helps small items like a cactus pot stay visible from below. It is a small detail that makes a big difference in how the shelf reads on the wall.
Conclusion
Building your own angular cedar floating shelf is a straightforward project that gives you a custom piece of decor for almost nothing. The wood grain, the slanted cut, and the simple styling with a cactus, snake plant, and copper tray all come together in a look that feels modern without being cold. I hope you give this build a try. Start with a board of cedar, carve out an afternoon, and see what your white wall turns into.
If you do make one, share a photo of your shelf with me I would love to see how you style your plants.
Leave a Comment